Shop MSD For Your MSD Ignition parts in Canada & USA, call Marken Performance
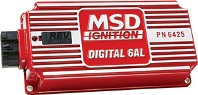 MSD has re-designed the 6AL ignition box. We kept the same bolt pattern as the traditional 6AL but lowered the profile for a sleek look. The wiring is all routed out one end of the unit through a sealed and locking connector. This eases installation and keeps your wiring looking neat and clean. The rev limiter was moved right on top of the housing for easy access to the two rotary dials to set the limit in 100 rpm increments. Inside the Digital 6AL you’ll find a microprocessor that monitors and controls every firing and rev limit. The circuits are updated with efficient components that help the ignition produce more power while drawing less current! In fact, the new Digital 6AL delivers over 530 volts to the coil with up to 135mJ of spark energy for every firing! Increased output combined with MSD’s proven multiple spark series is a win-win situation! The new Digital 6AL are supplied with the wiring harness and the components you’ll need for installation. The 6AL is also supplied with vibration mounts. Both ignitions are compatible on 4, 6 or 8-cylinder engines with 12-volt, negative ground electrical systems. They’ll accept trigger inputs from breaker points, amplifiers and magnetic pickups. It also contains a built in LED indicator light for system checks.
Part # 6425 Video Info Digital 6AL Video of MSD Spark
![]()
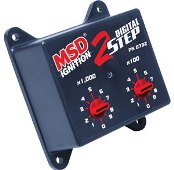
Since the new Digital 6AL Ignition uses rotary dials to adjust the rev limiter, our engineers were tasked with developing a 2-Step Rev Control that could be added to give racers the ability to switch to a low rpm limit to use on the starting line. The new 2-Step is also digitally controlled and connects to the Digital 6AL’s gray tach output wire. There are two easy to read rotary dials that let you set the launch rpm in 100 rpm increments. There is an activation wire that connects to the transbrake, a clutch switch or to the line-lock to activate the low rpm limit. When that switch is released, the low rpm limit is turned off and the car launches hard!
Part # 8732, use with above only.
For More MSD Products Click On: ByVehicle , ByProductType VideosMSDweb , VideosYouTube
![]()
![]()
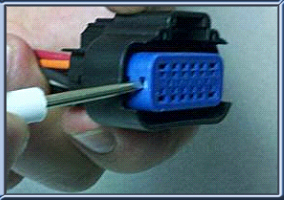
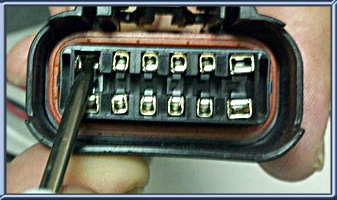
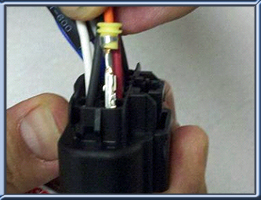
MSD Tech Tip - Rewiring a 6A or 6AL Connector:


![]()

You must login to post comments.